Install the WireMock plugin
The plugin is available on the JetBrains Marketplace.- Press ⌘Сmd, on Mac or CtrlAltS on other platforms to open settings and then select Plugins.
- Open the Marketplace tab, find the WireMock plugin, and click Install (restart the IDE if prompted).
Setup
The WireMock plugin comes with features that utilize users’ existing WireMock Cloud accounts and integrates local files with them, e.g. creating remote mock APIs from local stub mappings. So, if you have a WireMock Cloud account and want to connect to it and use Cloud specific features, head to the plugin settings at Settings | Tools | WireMock and log in to your account. Otherwise, no specific setup is required.Log in to WireMock Cloud
When WireMock is first installed, it is necessary to log in to your WireMock Cloud account, in order to be able to use related features. Logging in can happen at two different locations: via an editor notification after opening stub mappings files, or from the plugin’s settings UI.Credentials are stored safely by the IDE (on the IDE level), so
- they are completely separate from any WireMock CLI installation on the system,
- and if you are using the plugin in multiple IDEs, you have to log in in each of them.
From the editor notification
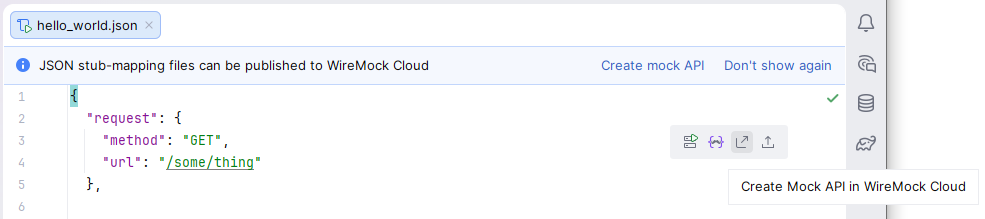
Upon opening a stub mapping JSON file, the following notification appears at the top of the editor. It provides a way to create an account if you haven’t already, or to use your existing account.
- shows a balloon popup with your verification code
- opens the login page in your web browser showing you a verification code

From the plugin settings
You can also log in to your account via the plugin settings at Settings | Tools | WireMock. The flow is similar to the one described in the previous section, but it is handled entirely on the settings UI, and you also have the option to Cancel Login.
Use with On-Premise Edition
The plugin also supports work with the on-premise edition of WireMock Cloud. To turn on this feature, enable the Use with On-Premise Edition option, update the necessary configuration values, and log in. If you are already logged into a different installment of WireMock Cloud, make sure to log out, save the settings, and log in again.
Create mock APIs and import stubs
If you want to convert local stub mappings to remotely hosted WireMock Cloud mock APIs, you can do so: open a stub mapping file, then click on the Create mock API link in the top notification, or the icon
in the floating toolbar.
icon
in the floating toolbar.
These actions are shown only when you are logged in to a WireMock Cloud account.
Mock API properties and types
When you initiate the mock API creation, you are presented with a dialog to specify the API name, description and custom hostname (both optional), and the type of the API to create.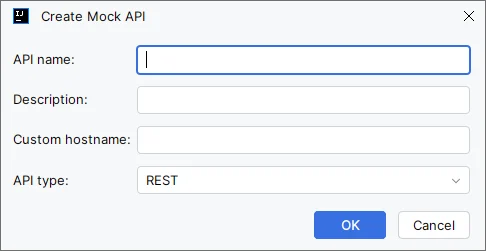

Completion of the API creation
The creation of the mock API and data upload into it is performed in two or three separate phases depending on the API type:- API creation and stub upload for Unstructured and REST,
- API creation, stub upload and schema/descriptor upload for GraphQL and gRPC

Import stubs into existing mock APIs
Besides uploading stubs into newly created APIs, you can also upload them into APIs that already exist in your WireMock Cloud account. You can do so by opening a stub mapping file, then clicking on the icon in the floating toolbar.
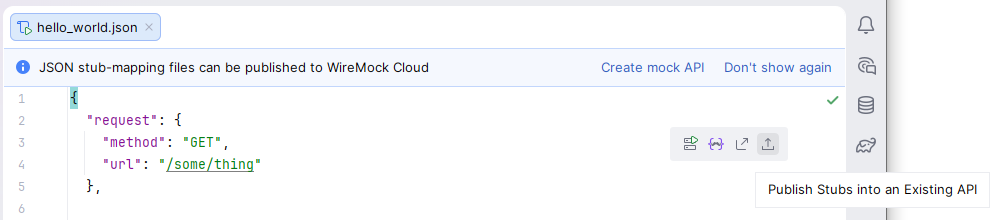
This action is shown only when you are logged in to a WireMock Cloud account.This feature adds the uploaded stubs to the target mock API without deleting existing stubs.
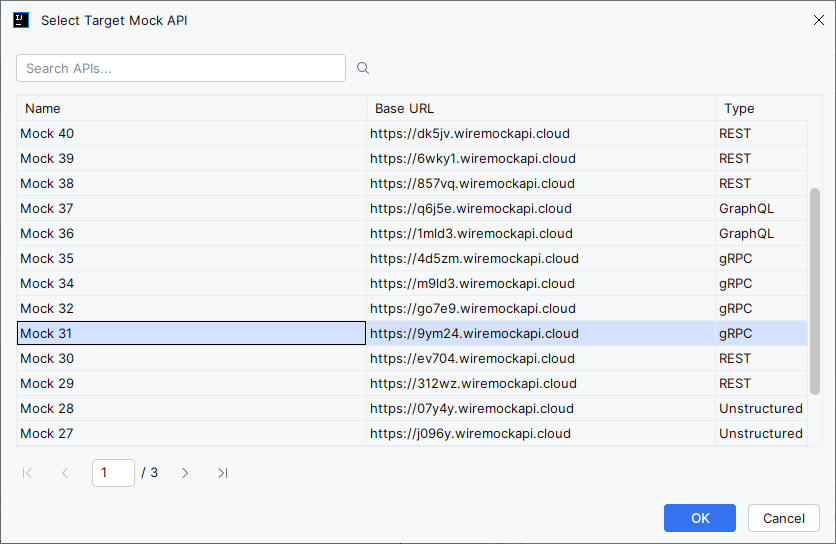
Search
When opening the dialog, it displays all available mock APIs. After that you can perform searches with arbitrary query strings (it is case-insensitive) either by clicking the button or by hitting Enter.
It looks for matches in APIs’ names, base URLs and descriptions too. (Showing descriptions is not yet supported.)
If you’d like to reset the results and see all available mock APIs, perform a search with an empty string.
button or by hitting Enter.
It looks for matches in APIs’ names, base URLs and descriptions too. (Showing descriptions is not yet supported.)
If you’d like to reset the results and see all available mock APIs, perform a search with an empty string.
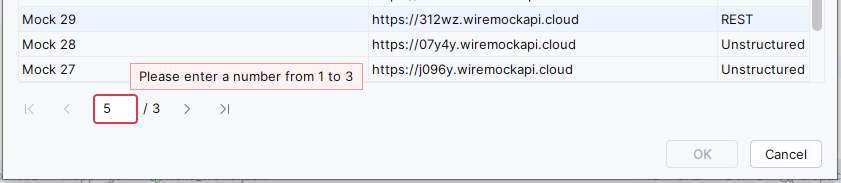
Mock APIs list
The matching mock APIs are listed in this table with their names, base URLs and types shown. Each result page shows up to 20 items (that value is not customizable), and the table allows selecting at most 1 mock API as the target. If no API is selected, the dialog cannot be OKed. On top of initiating the stub import using the OK button, double-clicking on a mock API also does the same. To locate an API easier on the current page, you can use speed search: click somewhere in the table, then start typing. When there is a match, the first matching row will be selected.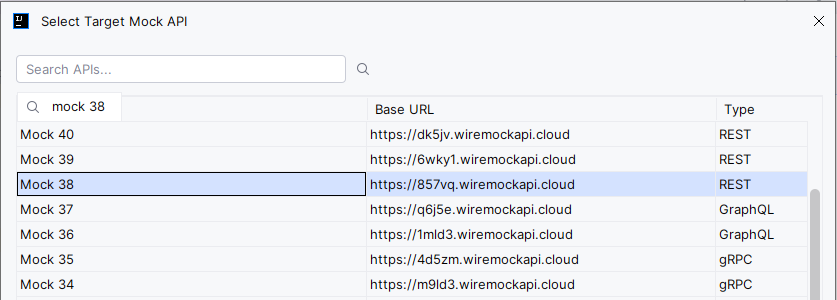
Pagination
This component lets you navigate through the current result set. It supports moving to the First, Previous, Next and Last pages when applicable, as well as to arbitrary pages. To initiate the navigation to a specific page, specify a valid page number and hit Enter. If it is initiated with a number- less than 1, or a non-integer, it will load the first page
- greater than the total number of pages, it will load the last page