> ## Documentation Index
> Fetch the complete documentation index at: https://docs.wiremock.io/llms.txt
> Use this file to discover all available pages before exploring further.
# OpenAPI Git Integration
> Integrating your Git repository with your mock API
WireMock Cloud offers the ability to synchronize your mock API's OpenAPI spec with a Git repository.
This synchronization is bidirectional, allowing you to pull your spec from Git to WireMock Cloud, as well as push
updates from WireMock Cloud to Git.
This enables WireMock Cloud to be integrated into your workflows seamlessly.
Your stubs can be kept up to date without having to manually copy your specification into WireMock Cloud each time it is
updated, and you can prototype your OpenAPI specification in WireMock Cloud before pushing it to your code base.
## Configuring your Git integration
To configure your mock API to synchronize its OpenAPI document with a Git repository, navigate to the Settings tab of
the OpenAPI page.
Toggle "Enable synchronization" in the Git repository settings section.
Fill in the fields with the appropriate Git configuration data, including the SSH address of your Git repository and
the path to the OpenAPI file within the repository.
The key that WireMock Cloud will use to authenticate calls to your Git repository must also be configured here.
You can either select an existing key or create a new one.
You can learn more about keys in WireMock Cloud [here](/security/key-management).
Once you have entered the relevant Git repository configuration, save your changes.
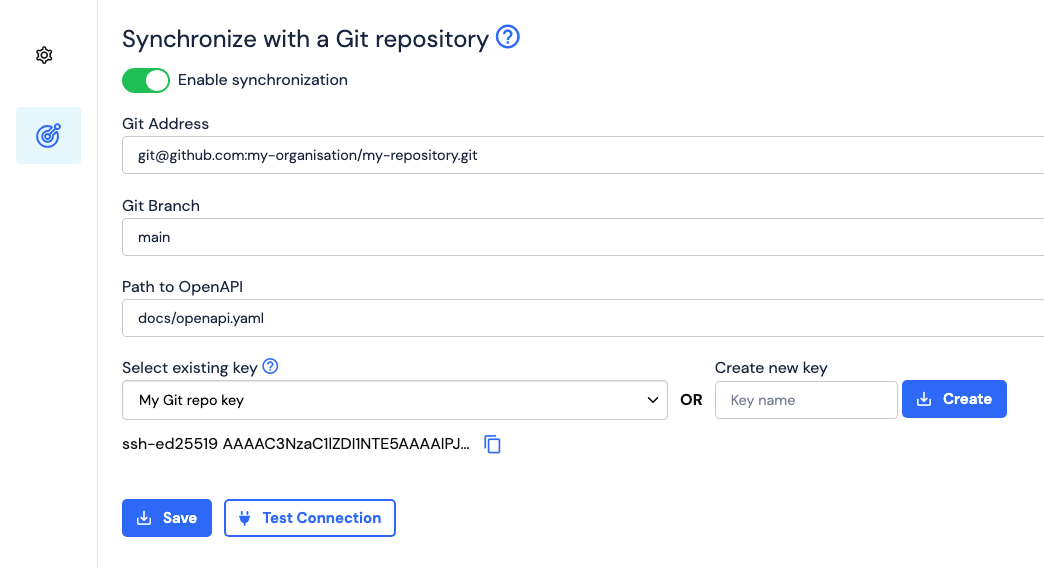 The SSH public key for the key you selected will be displayed at the bottom of the configuration.
[Add this key to your Git repository.](#adding-ssh-keys-to-your-git-repository)
When you navigate to the Document tab of the OpenAPI page, there will be buttons for performing Git operations on your
OpenAPI document.
The SSH public key for the key you selected will be displayed at the bottom of the configuration.
[Add this key to your Git repository.](#adding-ssh-keys-to-your-git-repository)
When you navigate to the Document tab of the OpenAPI page, there will be buttons for performing Git operations on your
OpenAPI document.
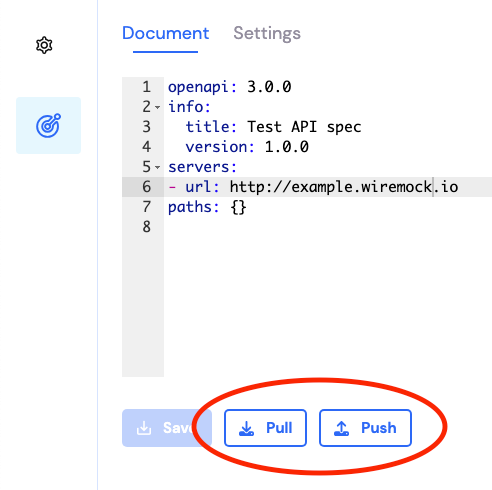 Clicking the Pull button will retrieve the contents of the file at the configured path in your Git repository and save
it in WireMock Cloud.
The document will be validated and stubs generated like normal.
The pulled document will appear in the document text area.
Note, this will not immediately overwrite any local changes you have made to the specification (see
[Git conflicts](#handling-git-conflicts) for details).
Clicking the Push button in the Document tab of the OpenAPI page will push your currently saved OpenAPI document on
WireMock Cloud to the configured Git repository.
If the file does not exist on the configured branch of the Git repository, then it will be created by this action.
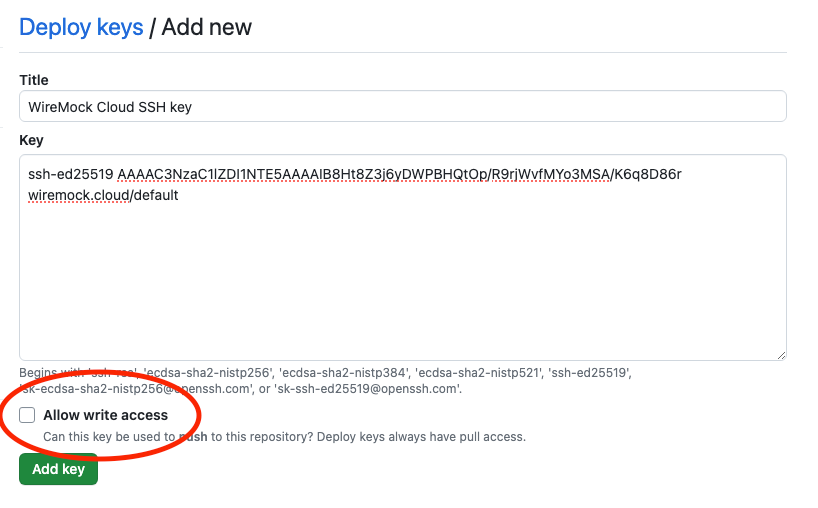
If you wish to push to your Git repository, ensure that write access is granted to the SSH key when you add it to your
repository, if required by the platform (e.g. GitHub).
With the Git integration enabled, changes can still be saved to WireMock Cloud's copy of the OpenAPI document
independently of the configured Git repository.
WireMock Cloud and your Git repository are only synchronized when the document is pulled or pushed.
## Handling Git Conflicts
[//]: # "WARNING: This heading is referenced by the UI. Do not change it without changing the link in the UI."
There are circumstances where performing a pull or push will cause conflicts with your mock API's copy of your OpenAPI
specification.
This can occur when a pull is attempted after changes have been applied to your mock API's copy of the specification
that have yet to be pushed to your repository, or when pushing after changes have been made to the file in the
repository since the last time it was pulled into WireMock.
In these cases, attempting a pull or push will display a dialog explaining that your mock API is out of sync with the
repository and ask if you wish to overwrite the document on WireMock (when pulling) or the document in the repository
(when pushing).
If this dialog is cancelled, no changes will occur in WireMock or your repository.
If you are receiving these conflict messages and are unsure of what action to perform, WireMock recommends performing
an overwriting push to the repository, rather than an overwriting pull to your mock API, and resolving any issues using
external Git tooling.
This ensures that no data is lost, since all changes will be logged in version control.
## Testing Connections to Your Git Repository
If you want to test that your Git configuration is correct before attempting a pull or push (or even saving the
configuration), you can use the "Test Connection" button on the settings page.
Simply fill in the configuration fields and press the button.
If WireMock Cloud is able to connect to your Git repository, then a success will be displayed.
Otherwise, a message will be displayed explaining what went wrong.
## Adding SSH Keys to Your Git Repository
[//]: # "WARNING: This heading is referenced by the UI. Do not change it without changing the link in the UI."
In order for WireMock Cloud to be able to communicate with your Git repository, you must add the SSH public key displayed in your mock API's OpenAPI settings to the repository.
The process for adding the public key to your Git repository depends on the method you are using to host your Git
repository.
Below are instructions for adding keys to your repository on popular hosting platforms.
These instructions are up-to-date as of writing, but are subject to changes outside WireMock's control.
### GitHub
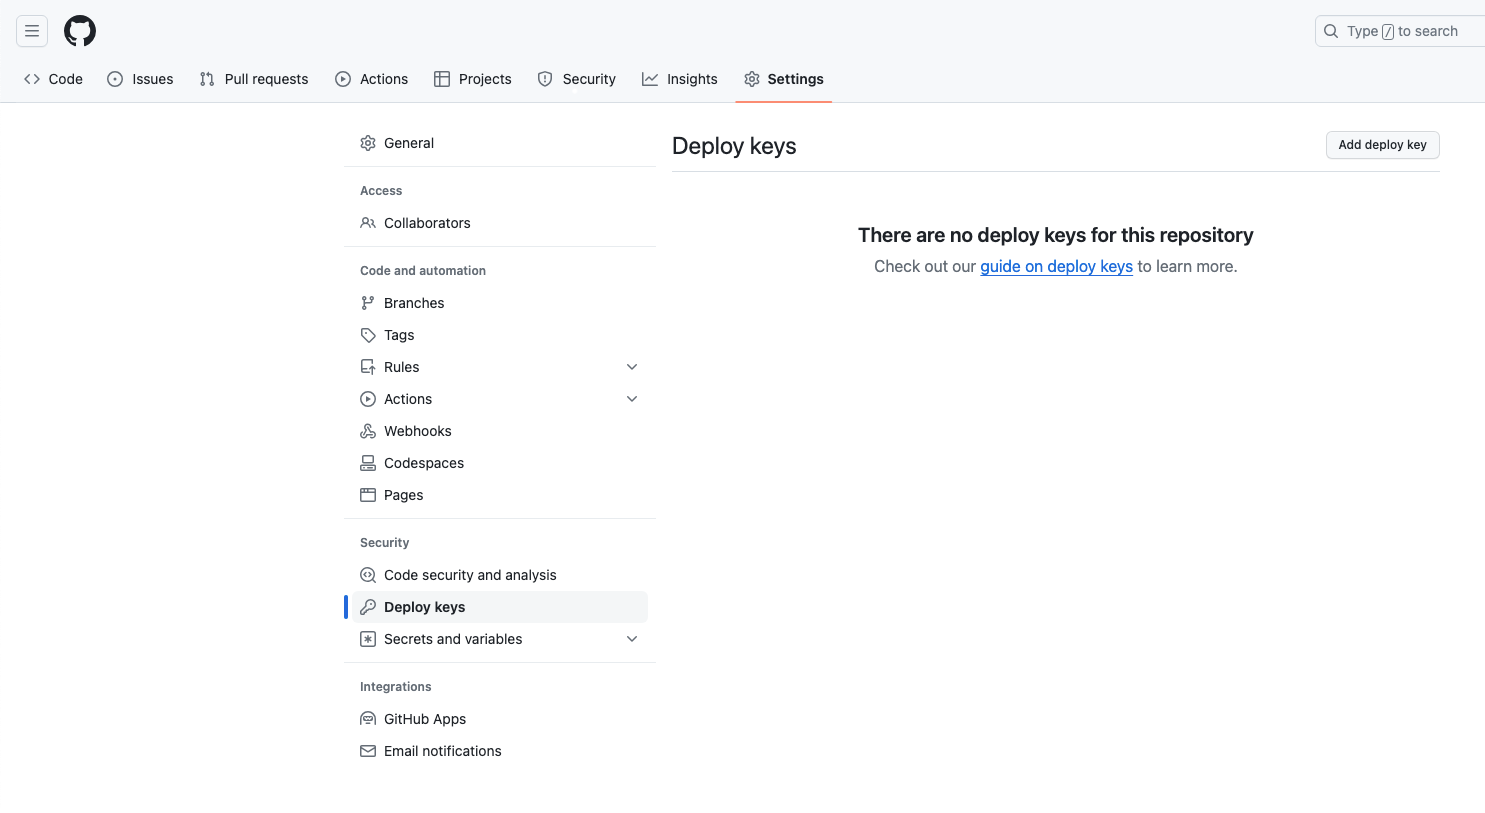
If you are hosting a repository on [GitHub](https://github.com), you can add the key to your repository via the "Deploy
keys" page of the repository settings tab.
Clicking the Pull button will retrieve the contents of the file at the configured path in your Git repository and save
it in WireMock Cloud.
The document will be validated and stubs generated like normal.
The pulled document will appear in the document text area.
Note, this will not immediately overwrite any local changes you have made to the specification (see
[Git conflicts](#handling-git-conflicts) for details).
Clicking the Push button in the Document tab of the OpenAPI page will push your currently saved OpenAPI document on
WireMock Cloud to the configured Git repository.
If the file does not exist on the configured branch of the Git repository, then it will be created by this action.
If you wish to push to your Git repository, ensure that write access is granted to the SSH key when you add it to your
repository, if required by the platform (e.g. GitHub).
With the Git integration enabled, changes can still be saved to WireMock Cloud's copy of the OpenAPI document
independently of the configured Git repository.
WireMock Cloud and your Git repository are only synchronized when the document is pulled or pushed.
## Handling Git Conflicts
[//]: # "WARNING: This heading is referenced by the UI. Do not change it without changing the link in the UI."
There are circumstances where performing a pull or push will cause conflicts with your mock API's copy of your OpenAPI
specification.
This can occur when a pull is attempted after changes have been applied to your mock API's copy of the specification
that have yet to be pushed to your repository, or when pushing after changes have been made to the file in the
repository since the last time it was pulled into WireMock.
In these cases, attempting a pull or push will display a dialog explaining that your mock API is out of sync with the
repository and ask if you wish to overwrite the document on WireMock (when pulling) or the document in the repository
(when pushing).
If this dialog is cancelled, no changes will occur in WireMock or your repository.
If you are receiving these conflict messages and are unsure of what action to perform, WireMock recommends performing
an overwriting push to the repository, rather than an overwriting pull to your mock API, and resolving any issues using
external Git tooling.
This ensures that no data is lost, since all changes will be logged in version control.
## Testing Connections to Your Git Repository
If you want to test that your Git configuration is correct before attempting a pull or push (or even saving the
configuration), you can use the "Test Connection" button on the settings page.
Simply fill in the configuration fields and press the button.
If WireMock Cloud is able to connect to your Git repository, then a success will be displayed.
Otherwise, a message will be displayed explaining what went wrong.
## Adding SSH Keys to Your Git Repository
[//]: # "WARNING: This heading is referenced by the UI. Do not change it without changing the link in the UI."
In order for WireMock Cloud to be able to communicate with your Git repository, you must add the SSH public key displayed in your mock API's OpenAPI settings to the repository.
The process for adding the public key to your Git repository depends on the method you are using to host your Git
repository.
Below are instructions for adding keys to your repository on popular hosting platforms.
These instructions are up-to-date as of writing, but are subject to changes outside WireMock's control.
### GitHub
If you are hosting a repository on [GitHub](https://github.com), you can add the key to your repository via the "Deploy
keys" page of the repository settings tab.
 Make sure to allow the key write access if you want to push to the repository from WireMock Cloud.
 ### Bitbucket
If you are hosting a repository on [Bitbucket](https://bitbucket.org), you can add the key to your repository via the
repository's "Access keys" page.
### Bitbucket
If you are hosting a repository on [Bitbucket](https://bitbucket.org), you can add the key to your repository via the
repository's "Access keys" page.
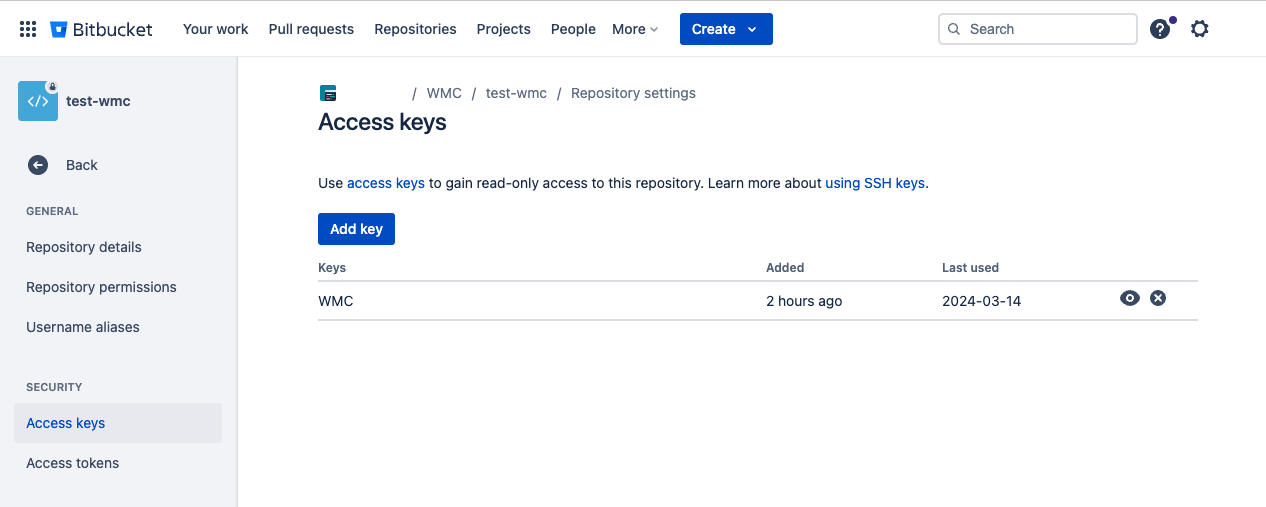 Bitbucket's access keys are limited to read-only access to a repository.
This means pushing from WireMock Cloud is not possible when using access keys.
If write access is required, the key can be added to a user's personal SSH keys.
Bitbucket's access keys are limited to read-only access to a repository.
This means pushing from WireMock Cloud is not possible when using access keys.
If write access is required, the key can be added to a user's personal SSH keys.
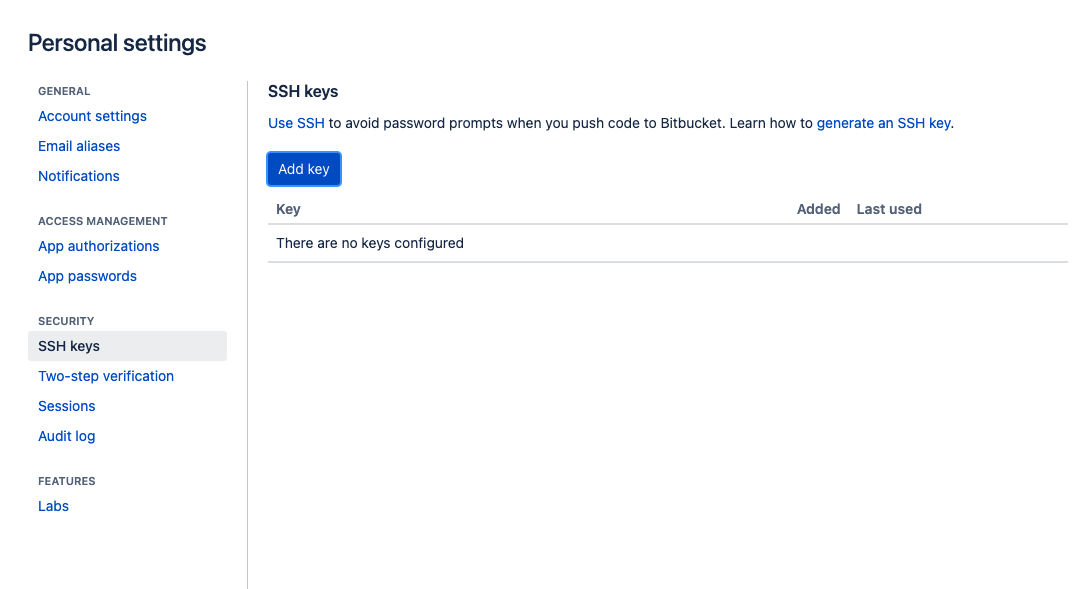 This will allow the key write access to all repositories that the user has access to.
Therefore, it may be advisable to create a specific user for WireMock Cloud in your Bitbucket organisation that only has
access to the desired repository.
### Gitlab
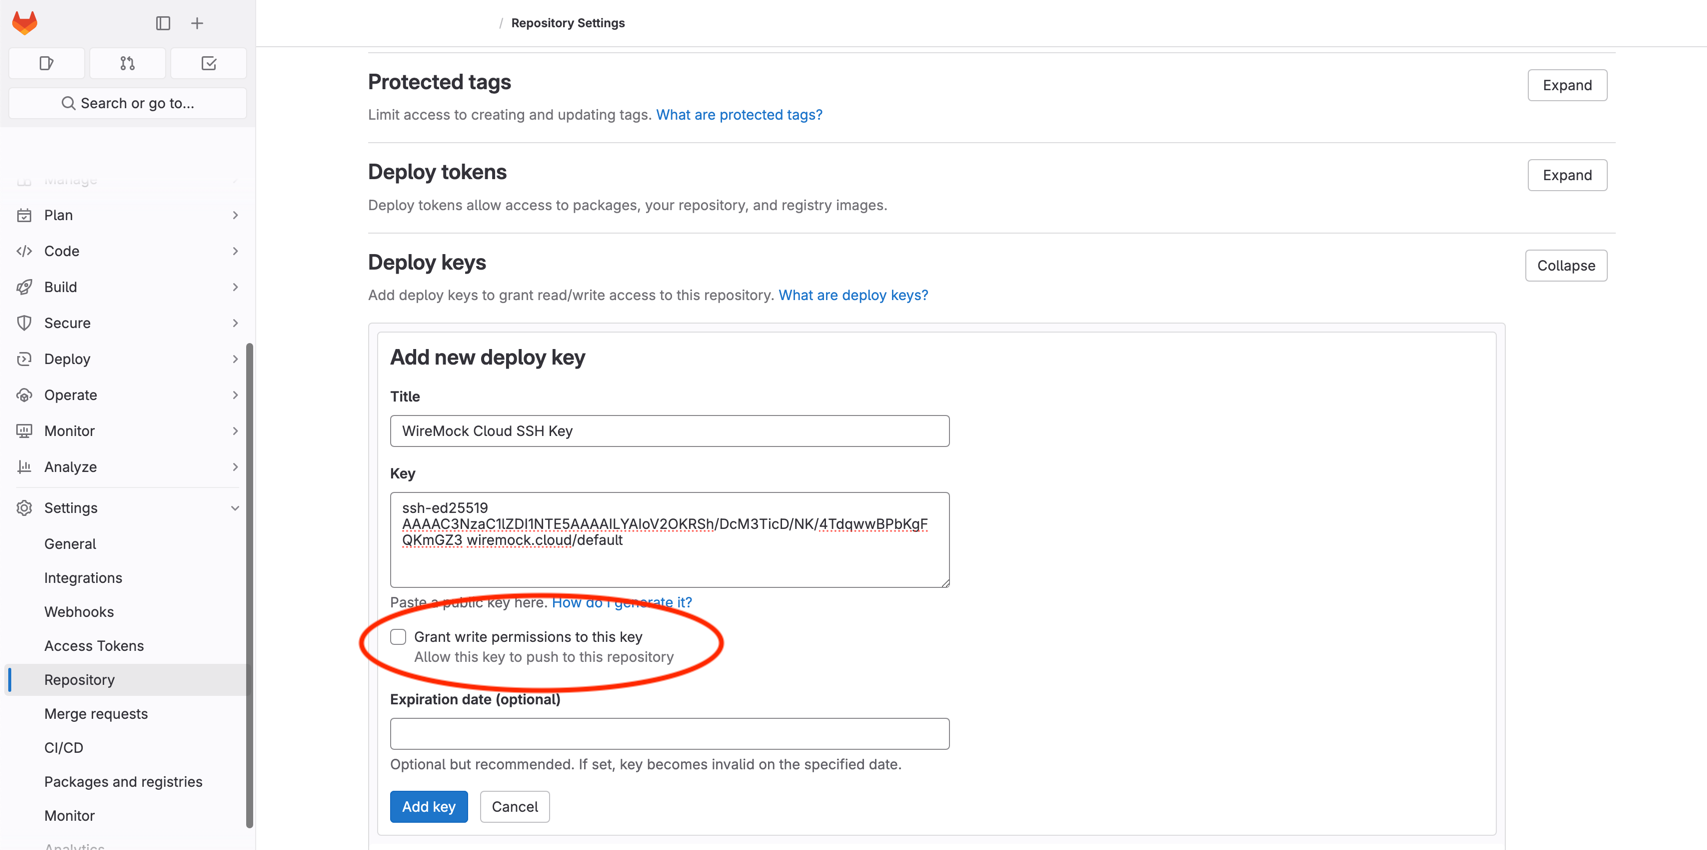
If you are hosting a repository on [Gitlab](https://gitlab.com), you can add the key to your repository via the
repository's "Deploy keys" section of the repository settings page.
Make sure to grant the key write permissions if you want to push to the repository from WireMock Cloud.
This will allow the key write access to all repositories that the user has access to.
Therefore, it may be advisable to create a specific user for WireMock Cloud in your Bitbucket organisation that only has
access to the desired repository.
### Gitlab
If you are hosting a repository on [Gitlab](https://gitlab.com), you can add the key to your repository via the
repository's "Deploy keys" section of the repository settings page.
Make sure to grant the key write permissions if you want to push to the repository from WireMock Cloud.
 ### Self-Hosted Server
If you are hosting a repository on a server that you maintain, adding the key to your repository will generally involve
adding it to the Git user's `.ssh/authorized_keys` file.
For example, if your Git repository address is `git-user@my-git-server.com:path/to/repository.git`, you will likely have
to append the key to the contents of `/home/git-user/.ssh/authorized_keys` on the server that `my-git-server.com`
addresses.
Approaches may vary, so it is best to consult your system administrator.
For security purposes, WireMock recommends creating a specific user for WireMock Cloud on your server with read
permission on the Git repository directory only (and write permission if pushing from WireMock Cloud is desired).
### Self-Hosted Server
If you are hosting a repository on a server that you maintain, adding the key to your repository will generally involve
adding it to the Git user's `.ssh/authorized_keys` file.
For example, if your Git repository address is `git-user@my-git-server.com:path/to/repository.git`, you will likely have
to append the key to the contents of `/home/git-user/.ssh/authorized_keys` on the server that `my-git-server.com`
addresses.
Approaches may vary, so it is best to consult your system administrator.
For security purposes, WireMock recommends creating a specific user for WireMock Cloud on your server with read
permission on the Git repository directory only (and write permission if pushing from WireMock Cloud is desired).