> ## Documentation Index
> Fetch the complete documentation index at: https://docs.wiremock.io/llms.txt
> Use this file to discover all available pages before exploring further.
# Support for WireMock OSS
> Features supporting the OSS (non-WireMock Cloud) side of WireMock
## Create WireMock stubs
### Create basic WireMock stub from scratch
If a JSON file is placed in the **mappings** or **messages** folder, or contains the `"mappings"` or `"messageMappings"`key,
the plugin recognizes it as a WireMock stub file and provides appropriate coding assistance.
1. In the **Project** tool window, right-click a folder (or press ⌘СmdN or AltInsert) and select **New | File**.
2. In the **New File** dialog that opens, enter a name of the file. For example, you can enter `mappings/my-stub.json`, and the plugin will create the **mappings** folder and place the new file within it.
3. Start typing a key to get suggestions for applicable keys and their quick documentation.
 #### Additional coding assistance
This coding assistance also includes the following features (supporting both HTTP and message stubs):
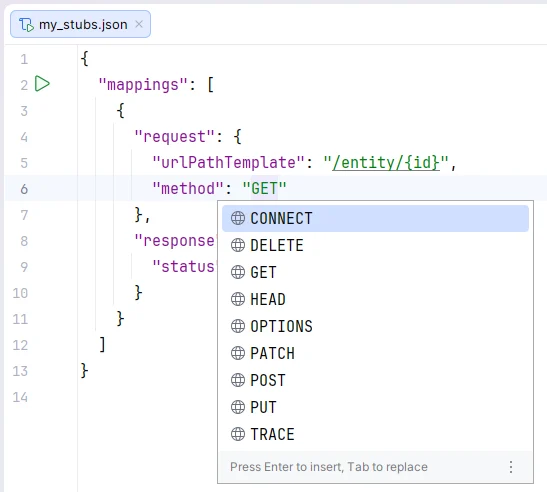
* Code completion of HTTP methods in JSON properties like `request.method` in HTTP stubs, and `trigger.requestPattern.method` and other request pattern locations in message stubs
#### Additional coding assistance
This coding assistance also includes the following features (supporting both HTTP and message stubs):
* Code completion of HTTP methods in JSON properties like `request.method` in HTTP stubs, and `trigger.requestPattern.method` and other request pattern locations in message stubs
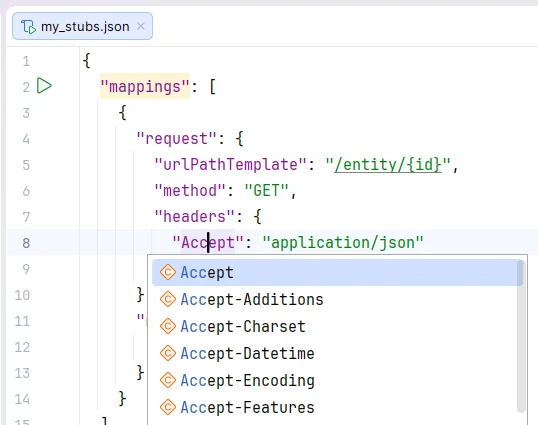
 * Code completion of HTTP headers in JSON properties like `request.headers.*`
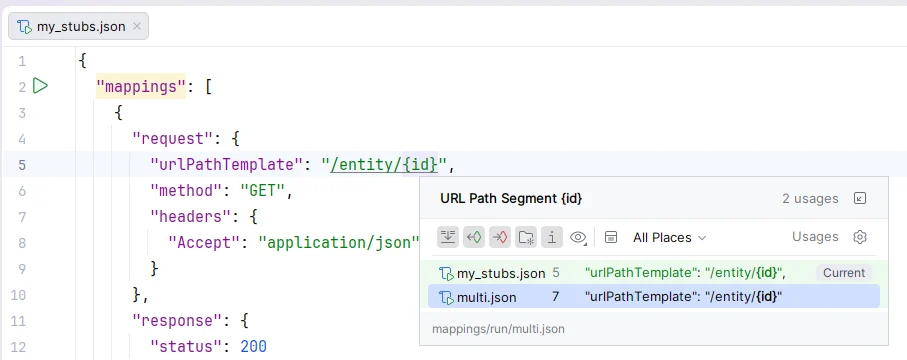
 * Server URL references in JSON properties like `request.url`, and in parameters of Java methods like `WireMock.urlEqualTo()`
 ### Create WireMock stubs from Endpoints tool window
1. Open the **Endpoints** tool window (**View | Tool Windows | Endpoints**).
2. Right-click an endpoint and select **Generate WireMock Stubs**.
### Create WireMock stubs from Endpoints tool window
1. Open the **Endpoints** tool window (**View | Tool Windows | Endpoints**).
2. Right-click an endpoint and select **Generate WireMock Stubs**.
 The new stub file is saved as a [scratch](https://www.jetbrains.com/help/idea/scratches.html) under **Scratches and Consoles | WireMock Stubs**.
### Create WireMock stubs from OpenAPI specification
1. Open an OpenAPI specification file.
2. Click
The new stub file is saved as a [scratch](https://www.jetbrains.com/help/idea/scratches.html) under **Scratches and Consoles | WireMock Stubs**.
### Create WireMock stubs from OpenAPI specification
1. Open an OpenAPI specification file.
2. Click  and select **Generate WireMock Stubs**.
 The new stub file is saved as a [scratch](https://www.jetbrains.com/help/idea/scratches.html) under **Scratches and Consoles | WireMock Stubs**.
## Run WireMock server
1. Open your stub file.
2. Click
The new stub file is saved as a [scratch](https://www.jetbrains.com/help/idea/scratches.html) under **Scratches and Consoles | WireMock Stubs**.
## Run WireMock server
1. Open your stub file.
2. Click  in the upper-right part of the editor.
 This will start the WireMock server, and you can see it running in the **Services** tool window (**View | Tool Windows | Services** or press ⌘Сmd8 or Alt8).
 To customize how IntelliJ IDEA starts the WireMock server, you can [modify the WireMock run configuration](#wiremock-run-configuration) or create a new one.
## Send HTTP requests
Use the IntelliJ IDEA [HTTP Client](https://www.jetbrains.com/help/idea/http-client-in-product-code-editor.html) to send HTTP request to the WireMock server and preview responses.
1. [Run your WireMock server.](#run-wiremock-server)
2. Open your stub JSON file.
3. Place the caret at your endpoint URL, press ⌥Option↩Enter or Alt↩Enter (**Show Context Actions**), and select **Generate request in HTTP Client**.
You can view the stub response in the **Services** tool window.
To customize how IntelliJ IDEA starts the WireMock server, you can [modify the WireMock run configuration](#wiremock-run-configuration) or create a new one.
## Send HTTP requests
Use the IntelliJ IDEA [HTTP Client](https://www.jetbrains.com/help/idea/http-client-in-product-code-editor.html) to send HTTP request to the WireMock server and preview responses.
1. [Run your WireMock server.](#run-wiremock-server)
2. Open your stub JSON file.
3. Place the caret at your endpoint URL, press ⌥Option↩Enter or Alt↩Enter (**Show Context Actions**), and select **Generate request in HTTP Client**.
You can view the stub response in the **Services** tool window.
 ## Enable support for Handlebars templates
IntelliJ IDEA provides coding assistance for templating language used in WireMock response templates. To use this feature, you need the [Handlebars/Mustache](https://plugins.jetbrains.com/plugin/6884-handlebars-mustache) plugin to be installed and enabled.
1. Open your HTTP or message stub JSON file.
2. In the upper-right part of the editor, click
## Enable support for Handlebars templates
IntelliJ IDEA provides coding assistance for templating language used in WireMock response templates. To use this feature, you need the [Handlebars/Mustache](https://plugins.jetbrains.com/plugin/6884-handlebars-mustache) plugin to be installed and enabled.
1. Open your HTTP or message stub JSON file.
2. In the upper-right part of the editor, click  (**Use Handlebars Templates**). If the [Handlebars/Mustache](https://plugins.jetbrains.com/plugin/6884-handlebars-mustache) plugin is not installed, the action will install it.
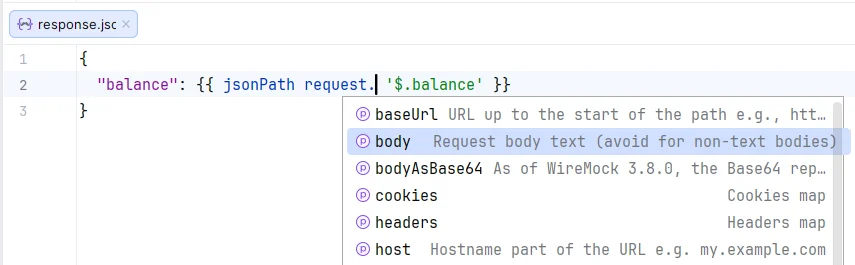
This will make IntelliJ IDEA treat JSON files placed in the `__files` directory as response templates and provide appropriate Handlebars coding assistance including
* Completion for [Handlebars helpers](https://wiremock.org/docs/response-templating/#handlebars-helpers)
(**Use Handlebars Templates**). If the [Handlebars/Mustache](https://plugins.jetbrains.com/plugin/6884-handlebars-mustache) plugin is not installed, the action will install it.
This will make IntelliJ IDEA treat JSON files placed in the `__files` directory as response templates and provide appropriate Handlebars coding assistance including
* Completion for [Handlebars helpers](https://wiremock.org/docs/response-templating/#handlebars-helpers)
 * Completion for [request model](https://wiremock.org/docs/response-templating/#the-request-model) and [message model](https://wiremock.org/docs/messaging/stubbing/#available-template-variables) attributes
 ## WireMock run configuration
Create: Run | Edit Configurations | + | WireMock
IntelliJ IDEA comes with a dedicated **WireMock** run configuration, which allows you to customize how to start the WireMock server.
## WireMock run configuration
Create: Run | Edit Configurations | + | WireMock
IntelliJ IDEA comes with a dedicated **WireMock** run configuration, which allows you to customize how to start the WireMock server.
 ### Main parameters
* **Name**: Specify a name for the run configuration.
* **Stubs file**: Location of the JSON file with WireMock stubs to run.
* **Server port**: HTTP port number for the WireMock server. Enter `0` to dynamically determine a port.
### Modify options
* **Verbose output**: Turn on verbose logging to stdout (equivalent for the `--verbose` option).
* **Enable global Handlebars templating**: Render all response definitions using Handlebars templates by passing the `--global-response-templating` [WireMock command line option](https://wiremock.org/docs/standalone/java-jar/#command-line-options).
* **JRE**: Select a JRE if you wish to run WireMock in a different runtime environment than JBR.
### Logs
Specify which log files generated while running the application should be displayed in the console on the dedicated tabs of the [Run](https://www.jetbrains.com/help/idea/2025.3/run-tool-window.html) tool window.
### Before launch
Select tasks to be performed before starting the selected run/debug configuration.
### Main parameters
* **Name**: Specify a name for the run configuration.
* **Stubs file**: Location of the JSON file with WireMock stubs to run.
* **Server port**: HTTP port number for the WireMock server. Enter `0` to dynamically determine a port.
### Modify options
* **Verbose output**: Turn on verbose logging to stdout (equivalent for the `--verbose` option).
* **Enable global Handlebars templating**: Render all response definitions using Handlebars templates by passing the `--global-response-templating` [WireMock command line option](https://wiremock.org/docs/standalone/java-jar/#command-line-options).
* **JRE**: Select a JRE if you wish to run WireMock in a different runtime environment than JBR.
### Logs
Specify which log files generated while running the application should be displayed in the console on the dedicated tabs of the [Run](https://www.jetbrains.com/help/idea/2025.3/run-tool-window.html) tool window.
### Before launch
Select tasks to be performed before starting the selected run/debug configuration.