> ## Documentation Index
> Fetch the complete documentation index at: https://docs.wiremock.io/llms.txt
> Use this file to discover all available pages before exploring further.
# Integration with Claude Code
> Manage and work with your WireMock Cloud resources via WireMock's MCP server in Claude Code
## What is Claude Code?
The [Claude Code](https://plugins.jetbrains.com/plugin/27310-claude-code-beta-) plugin is Anthropic's integration of Claude Code
into the JetBrains ecosystem. Explore its [documentation](https://code.claude.com/docs/en/jetbrains) for details.
## WireMock MCP server
WireMock, via its CLI tool, provides its own [MCP server](/ai-mcp/installation) implementation with which you can
manage and work with your WireMock Cloud resources from any MCP-compatible AI tool.
In order to be able to use the WireMock MCP server in Claude Code, the server configuration must be added to one of its configuration files.
The IDE plugin helps simplify that process, and also makes it possible to use the MCP server with the WireMock Cloud account you are logged in with
inside the IDE.
It provides two ways of managing the MCP server configuration:
* on-demand, one-click addition, update and removal via the plugin settings
* automatic update at certain points of the user workflow
This integration supports Claude's **user**, **project** and **local** scopes.
### On-demand configuration
On-demand actions are available at two distinct locations:
* via a balloon notification after each project launch
* via the plugin settings at **Settings | Tools | WireMock**
#### Balloon notification
First of all, this notification is tied to the presence of the Claude Code IDE plugin. It is displayed only when
the Claude plugin is installed.
If that condition is satisfied, the notification appears after each project launch (that is to support the *local* and *project* scopes),
but only once per project to minimize distraction.
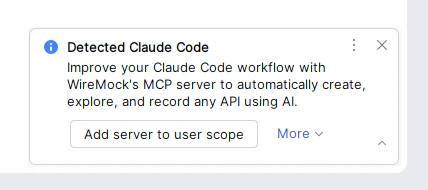 The balloon provides the following set of actions:
* Add server to user scope
* Add server to project scope
* Add server to local scope
* Don't show again
The addition actions open a new tab in the **Terminal** tool window
(based on the shell configured in **Settings | Tools | Terminal | Application Settings | Shell path**),
and execute the `claude mcp add ...` CLI command with the proper configuration for the MCP server.
By choosing **Don't show again**, the balloon will no longer be displayed for any projects in the future.
#### Plugin settings
MCP related options are available in the **MCP Server Configuration** section of the WireMock plugin settings.
The balloon provides the following set of actions:
* Add server to user scope
* Add server to project scope
* Add server to local scope
* Don't show again
The addition actions open a new tab in the **Terminal** tool window
(based on the shell configured in **Settings | Tools | Terminal | Application Settings | Shell path**),
and execute the `claude mcp add ...` CLI command with the proper configuration for the MCP server.
By choosing **Don't show again**, the balloon will no longer be displayed for any projects in the future.
#### Plugin settings
MCP related options are available in the **MCP Server Configuration** section of the WireMock plugin settings.
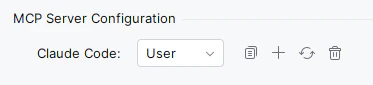 After choosing the Claude Code scope you want to manage the MCP server of, you can use the following options:
* **Add WireMock MCP Server** (
After choosing the Claude Code scope you want to manage the MCP server of, you can use the following options:
* **Add WireMock MCP Server** ( ):
executes the `claude mcp add ...` CLI command in a new Terminal tab
* **Update WireMock MCP Server** (
):
executes the `claude mcp add ...` CLI command in a new Terminal tab
* **Update WireMock MCP Server** ( ):
executes the `claude mcp remove ...` and `claude mcp add ...` CLI commands in a new Terminal tab
* **Delete WireMock MCP Server** (
):
executes the `claude mcp remove ...` and `claude mcp add ...` CLI commands in a new Terminal tab
* **Delete WireMock MCP Server** ( ):
executes the `claude mcp remove ...` CLI command in a new Terminal tab
- Upon clicking on these buttons, the CLI commands are not executed immediately. Instead, the last selection is saved,
and the corresponding CLI command(s) will be executed after closing the Settings.
- If you change your mind, and don't want the selected action to be executed, you can reset your selection using the
settings page's native **Revert changes** feature at the top.
To support the manual configuration of the MCP server in Claude Code, you can also use the
**Copy WireMock MCP Server to Clipboard** (
):
executes the `claude mcp remove ...` CLI command in a new Terminal tab
- Upon clicking on these buttons, the CLI commands are not executed immediately. Instead, the last selection is saved,
and the corresponding CLI command(s) will be executed after closing the Settings.
- If you change your mind, and don't want the selected action to be executed, you can reset your selection using the
settings page's native **Revert changes** feature at the top.
To support the manual configuration of the MCP server in Claude Code, you can also use the
**Copy WireMock MCP Server to Clipboard** ( )
button.
In order to have the latest plugin settings values generated into the MCP server configuration,
and the latest credentials used, save the settings before using these actions.
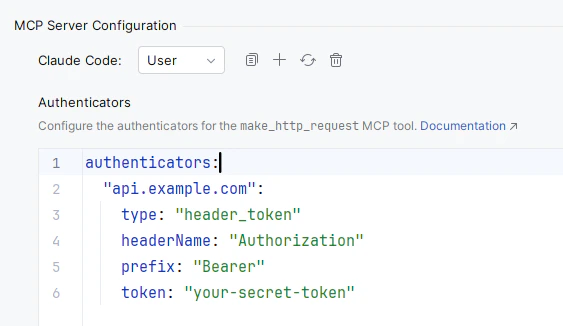
**Authenticators for the make\_http\_request tool**
Besides on-demand configuration options, the plugin settings also provides a way to configure the authenticators for the
[`make_http_request`](/ai-mcp/http-request-authentication#basic-structure) MCP tool in the same way they can be configured in WireMock CLI.
In order to use the latest authenticators value, save the settings, then use one of the on-demand actions, or log in to WireMock Cloud.
)
button.
In order to have the latest plugin settings values generated into the MCP server configuration,
and the latest credentials used, save the settings before using these actions.
**Authenticators for the make\_http\_request tool**
Besides on-demand configuration options, the plugin settings also provides a way to configure the authenticators for the
[`make_http_request`](/ai-mcp/http-request-authentication#basic-structure) MCP tool in the same way they can be configured in WireMock CLI.
In order to use the latest authenticators value, save the settings, then use one of the on-demand actions, or log in to WireMock Cloud.
 ### Automatic updates
In a few scenarios the WireMock MCP server configuration and credentials are updated automatically in all supported Claude Code config files,
and the input configuration file.
This is to make sure that the configuration stays up-to-date with the current plugin settings, login status, and the currently used IDE.
The update happens in the background, and it is due to how the server configuration is built.
See the [MCP server structure](#mcp-server-structure) section below for details.
These scenarios are:
* you log in to your WireMock Cloud account in the IDE
* you log out from your account
* you save the WireMock plugin settings
* the IDE is launched
The plugin detects if the server is registered to use WireMock CLI directly. In that case it doesn't update
the server config to the plugin specific one.
### MCP server configuration
The server config and the companion input config file built and managed by the WireMock plugin is different from
the [MCP server config used via WireMock CLI](/ai-mcp/installation#step-3:-configure-your-ai-tool).
This one uses the WireMock Cloud credentials and settings configured in the IDE, and not the data set in
a local installation of WireMock CLI.
This makes it better integrated with the IDE, and provides a smoother user experience when it comes to configuring the server.
Because of the way the server configuration is built, and is updated automatically, manual editing,
especially of the `command` and `args` attributes, is not recommended.
The server itself is registered and managed with the name `wiremock`, all lowercase letters, and is built as follows:
```json theme={null}
{
"wiremock": {
"command": "",
"args": [ "-classpath", "", "com.intellij.wiremock.ai.mcp.runner.McpServerRunnerKt" ]
}
}
```
In summary, the plugin provides a class that configures and executes the MCP server, and it builds a Java CLI command to
execute that class.
#### Input data
As for input data it reads a YAML configuration that is managed by the plugin inside the following directories:
* Windows: `%LOCALAPPDATA%\wiremock-intellij` (typically `C:\Users\{username}\AppData\Local\wiremock-intellij`)
* macOs: `/Users/{username}/.config/wiremock-intellij`
* Linux: `~/.config/wiremock-intellij` (typically `/home/{username}/.config/wiremock-intellij`)
It stores the API key, user ID, email address, the Cloud API URL when the On-Premise Edition is enabled, and the authenticators.
They are all populated only when you are logged in to your WireMock Cloud account, and when the Claude Code plugin is installed,
otherwise they are left empty.
## Troubleshooting
### Logging
The MCP server runner also maintains a log file for each execution of the MCP server. If you run into an issue, you can look
into them for additional details:
* Windows: `%LOCALAPPDATA%\wiremock-mcp-server\logs` (typically `C:\Users\{username}\AppData\Local\wiremock-mcp-server\logs`)
* macOs: `/Users/{username}/Library/Logs/wiremock-mcp-server`
* Linux: `~/.local/state/logs/wiremock-mcp-server` (typically `/home/{username}/.local/state/logs/wiremock-mcp-server`)
## Using the MCP server with a local CLI installation
Although the plugin's own configuration mechanism provides a smoother user experience better integrated with the IDE and the plugin,
you certainly can use the MCP server via a local installation of WireMock CLI. For that, please refer
to the [Installing WireMock Cloud AI](/ai-mcp/installation#step-3:-configure-your-ai-tool) documentation
on the actual server configuration to register.
## Opting out from using the MCP server
If you no longer want to use the WireMock MCP server via the plugin,
* you can either remove it via the WireMock plugin settings as mentioned in the [Plugin settings](#plugin-settings) section
or directly in Claude Code,
* or you can opt to using it via WireMock CLI.
### Automatic updates
In a few scenarios the WireMock MCP server configuration and credentials are updated automatically in all supported Claude Code config files,
and the input configuration file.
This is to make sure that the configuration stays up-to-date with the current plugin settings, login status, and the currently used IDE.
The update happens in the background, and it is due to how the server configuration is built.
See the [MCP server structure](#mcp-server-structure) section below for details.
These scenarios are:
* you log in to your WireMock Cloud account in the IDE
* you log out from your account
* you save the WireMock plugin settings
* the IDE is launched
The plugin detects if the server is registered to use WireMock CLI directly. In that case it doesn't update
the server config to the plugin specific one.
### MCP server configuration
The server config and the companion input config file built and managed by the WireMock plugin is different from
the [MCP server config used via WireMock CLI](/ai-mcp/installation#step-3:-configure-your-ai-tool).
This one uses the WireMock Cloud credentials and settings configured in the IDE, and not the data set in
a local installation of WireMock CLI.
This makes it better integrated with the IDE, and provides a smoother user experience when it comes to configuring the server.
Because of the way the server configuration is built, and is updated automatically, manual editing,
especially of the `command` and `args` attributes, is not recommended.
The server itself is registered and managed with the name `wiremock`, all lowercase letters, and is built as follows:
```json theme={null}
{
"wiremock": {
"command": "",
"args": [ "-classpath", "", "com.intellij.wiremock.ai.mcp.runner.McpServerRunnerKt" ]
}
}
```
In summary, the plugin provides a class that configures and executes the MCP server, and it builds a Java CLI command to
execute that class.
#### Input data
As for input data it reads a YAML configuration that is managed by the plugin inside the following directories:
* Windows: `%LOCALAPPDATA%\wiremock-intellij` (typically `C:\Users\{username}\AppData\Local\wiremock-intellij`)
* macOs: `/Users/{username}/.config/wiremock-intellij`
* Linux: `~/.config/wiremock-intellij` (typically `/home/{username}/.config/wiremock-intellij`)
It stores the API key, user ID, email address, the Cloud API URL when the On-Premise Edition is enabled, and the authenticators.
They are all populated only when you are logged in to your WireMock Cloud account, and when the Claude Code plugin is installed,
otherwise they are left empty.
## Troubleshooting
### Logging
The MCP server runner also maintains a log file for each execution of the MCP server. If you run into an issue, you can look
into them for additional details:
* Windows: `%LOCALAPPDATA%\wiremock-mcp-server\logs` (typically `C:\Users\{username}\AppData\Local\wiremock-mcp-server\logs`)
* macOs: `/Users/{username}/Library/Logs/wiremock-mcp-server`
* Linux: `~/.local/state/logs/wiremock-mcp-server` (typically `/home/{username}/.local/state/logs/wiremock-mcp-server`)
## Using the MCP server with a local CLI installation
Although the plugin's own configuration mechanism provides a smoother user experience better integrated with the IDE and the plugin,
you certainly can use the MCP server via a local installation of WireMock CLI. For that, please refer
to the [Installing WireMock Cloud AI](/ai-mcp/installation#step-3:-configure-your-ai-tool) documentation
on the actual server configuration to register.
## Opting out from using the MCP server
If you no longer want to use the WireMock MCP server via the plugin,
* you can either remove it via the WireMock plugin settings as mentioned in the [Plugin settings](#plugin-settings) section
or directly in Claude Code,
* or you can opt to using it via WireMock CLI.